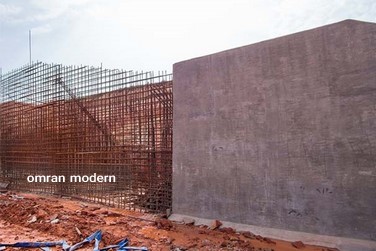
اجرای دیوار حایل

اجرای دیوار حایل

تعداد ارائه دهنده ها

۷ ارائه دهنده
intro
comment
bookmark
share

شهر

شهر را مشخص کنید

خدمات مرتبط در عمران مدرن

اجرای دیوار حایل

فروشندهمحلشماره تماس
عمران مدرن

عمران مدرن

۵

location

تهران

phone۰۲۱-۵۴۴۰۶۰۱۲
طراحان پی پژوه

طراحان پی پژوه

۵

location

تهران

phone

******۰۲۱۲۶

مجموعه  شرکت های کبیر

مجموعه شرکت های کبیر

۵

location

تهران

phone

******۰۲۱۸۸

آروین ترانشه ایستا

آروین ترانشه ایستا

۳

location

تهران

phone

******۰۲۱۴۴

سازه گستر فلق

سازه گستر فلق

۳

location

تهران

phone

******۰۲۱۸۸

پویشگران کاراب

پویشگران کاراب

۳

location

تهران

phone

******۰۹۱۲۴

سپاهان ساخت

سپاهان ساخت

۴

location

اصفهان

phone

******۰۹۱۹۳

ابتدا
۱
انتها

معرفی کالا

نظرات کاربران

Build a Retaining Wall on Slope

The process to build a retaining wall on slope can be divided into 10 steps to understand easily. The steps are described below.

Step 1

Layout the concrete stones that will be used where the wall will be built. Use the stones as a guide to spray paint lines on the ground. Put one line about eight inches behind the stones and the other line about three inches in front of the stones. After painting, move the stones aside until it is time to place them permanently.

Step 2

Dig a trench between the spray painted lines. The trench should be 12 inches deep. When working with a slope, start by digging at the lowest point of the slope until you reach 12 inches deep. As the trench is dug going up-hill toward the highest point, the trench will be deeper here. The trench at the highest point will not have a set depth as it must be equal to the lowest point. In other words, when the trench is poured it will be level. Be sure to rake out the soil from digging the trench and tamp it down.

Step 3

Add crushed limestone to the trench about three inches deep. This will enable proper drainage of the wall and will keep the wall from shifting or having excessive water pushing on it. Rake the crushed limestone until it is level then pour another three inches of crushed limestone. Rake and tamp down the second layer of limestone.

Step 4

Now it is time to start placing the stones or pavers. Place the first one in the trench at one end. Make sure the stone’s front edge is about three inches from the front of the trench. Check with a level to ensure that the stone is level in the trench. Tap the stone with a rubber mallet is it is uneven. Keep checking and tapping until it is level.

Step 5

Place the second stone next to the first one. This time, put the level across both stones and then tap down the second stone until it is level with the first one. If the stone happens to be lower than the first stone, then rake some crushed limestone underneath it to level it out with the first one. Repeat this technique until the base of the walls is completed.

Step 6

After laying the base row of the retaining wall add some crushed limestone in the trench behind the stones. Make sure to slope the crushed limestone toward the area where the water will drain. The slope should be around one inch per 1000 feet long. Using landscaping fabric, cover the crushed limestone that was placed behind the stones. Then cover the landscaping fabric with drainage aggregate about one inch thick. Add drain tile on top of the drainage aggregate and cover with landscaping fabric. The drain tile should be centered between the stones and the back of the trench.

Step 7

Using a wet saw, cut a stone in half then apply a thick bead of masonry adhesive to the top one of the stones in the base row. One of the halves will be placed on top of the masonry adhesive. Make sure that it is about ¾ inch from the front edge of the base stones. By doing this, the next row will be staggered. The staggering of the stones will enable the wall to be more sturdy and stable.

Step 8

Once the second row is started with the half stone, begin placing the stones in the row using masonry adhesive between the two rows. Remember to use a level to make sure that the rows are remaining level. Tap down with a rubber mallet to level the stones. The other half of the cut stone will be used once you reach the end of the row.

Step 9

Lay a third row using whole stones so that the rows remain staggered. Complete the wall using this technique of staggering the stones until it reaches the desired height. Once the wall is completed,  put drainage aggregate behind the stones until it is about two inches below the top of the wall. Cover the drainage aggregate with landscaping fabric.

Step 10

Use dirt to backfill the gap between the front of the trench and the stones. Tamp the dirt down to keep the base stones from shifting. Then add dirt to cover the landscaping fabric that is behind the wall. Then landscape the area behind the wall with grass or sod and then plant flowers or other plants.


امتیاز این مطلب:

امتیاز ۴.۰ از ۵ - از مجموع ۳ رای

نظرات کاربران

نام
نام خانوادگی
دیدگاه شما